Create a Survey FREE and Add it to Your Site using SurveyMonkey
Jan 02, 2013
For anyone interested in posting a questionnaire or poll on their site or in an email blast and be able to collect the results without spending your entire marketing budget, SurveyMonkey may be just what you've been looking for! With Surveymonkey, you can create a survey, word the questions and response choices any way you want, customize the design and layout of it, and be able to analyze the results in real time. Just about anything you'd need comes with their free "Basic" plan, but more features are available in their paid versions and the pricing isn't all that bad.
How to Create a Survey in SurveyMonkey
- Go to www.surveymonkey.com and sign up with a username and password.
- Click “Create Survey” - Green button, top right corner of screen.
- Give your poll a title, choose a category (this is optional and just helps it offer you generic questions, you can change it later or skip it altogether) Or the second option here is to “Copy an Existing Survey” which is handy if you just want to change your questions, but keep all the same settings.
- Next you can add questions to your survey by typing them in the field(s) below. Under “Question Bank” in the left sidebar, you can choose from their standard lists of questions under different categories; you can edit the wording of them after you choose them if you want.
- After you put in the wording for your question, you have to designate a “Question Type” from the dropdown menu (i.e. “Multiple Choice, only one answer", "Ratings scale," etc.) Depending what type of question you want it to be, you’ll be presented with more options (i.e., if it’s a multiple choice question, you’ll be able to type in the different answer choices like ‘yes,’ and ‘no’) *If you want this question to be “Required” you check that option in here also.
- Click “Save and Add Next Question” for all the questions in your survey. You're allowed to have up to 10 questions per survey with the free basic plan, no limit on the paid plans.
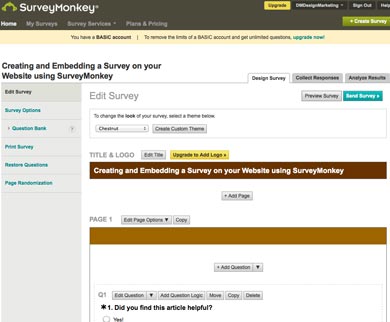
- You can change the colors of how your survey appears by choosing one of the preset themes at the top of the “Edit Survey” page. If you really want to customize you own unique theme, you'll need to upgrade to a paid version of Surveymonkey. You can see how the survey is going to look by clicking “Preview” at the bottom.
- In the left sidebar nav, you have a few display options for your survey under “Survey Options.” You can number the questions, or add a “progress bar” which may be helpful to a user if you had a lot of questions.
- When questions are added, click “Send Survey” at bottom; it brings you to a page with a link to take the survey at surveymonkey.com. But, in the spirit of Inbound Marketing, you want to direct all the traffic back to your site - so you want to embed the survey on a page on your site.
*Likewise, if you want to send an email blast to a list of leads/customers, you still will want to embed the survey on a page on your website and make sure the link in your email message directs everyone to your site. - Below it reads “More Ways to Send.” Choose “Website” to add on a page on your own website. You can resize how big it will look on your page under “Display Options” at the bottom of this page. You can experiment with this until you're happy with it. For a 1 column page on your site, try the size around 800w x 700h.
- On the left hand side navigation of this page, you can go under “Change Settings” to choose options like users can only take this survey once, and “Show Results” to the user after the survey is completed. **Note: only questions with assigned responses will display here (ratings, multiple choice questions); answers in the form of Comment Fields are only viewable by you.
- If you think your survey is how you want it, click “Save” to get the embed code to paste on your website. You can also preview your survey here, and if you want to adjust the size or anything else, just click “Edit” to be brought back to the previous page.
To See Survey Results
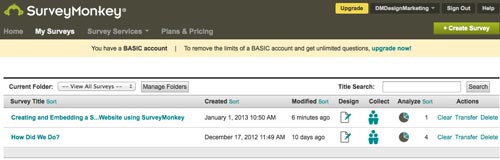
In the top nav of Surveymonkey, choose the “My Surveys” tab and click “Analyze” to view the real-time results of a specific survey.
To be able to download this data or share it with others, you have to upgrade to a paid version of Surveymonkey. You can always take a screenshot of the results or manually add the numbers to a spreadsheet of your own.
The “Collect Responses” tab gives you the option of creating more embed codes of the survey, in case you wanted to post the same survey somewhere else (another site) and be able to differentiate if the results are different from a different traffic source. Choose “Website” to get an embed code for a webpage.
Try out a quick sample survey here.